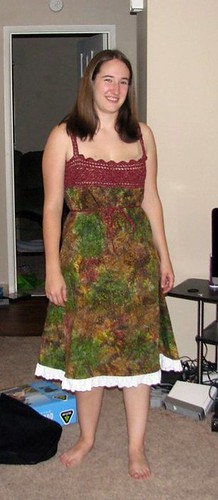
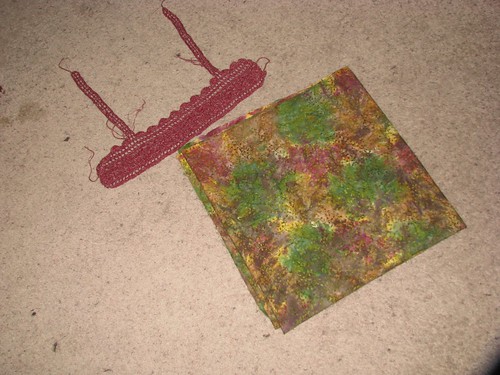
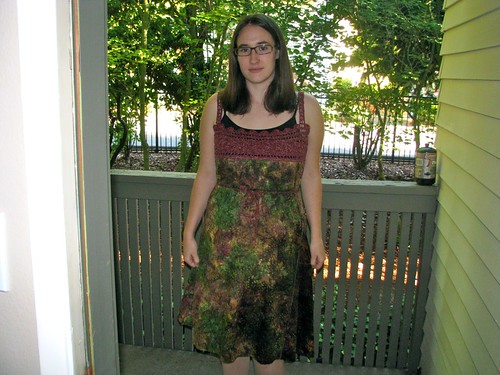
This is my take on Nell by Berroco Design Team. Clearly I took some liberties with the fabric part of the design, but the bodice is crocheted just as the pattern is written.
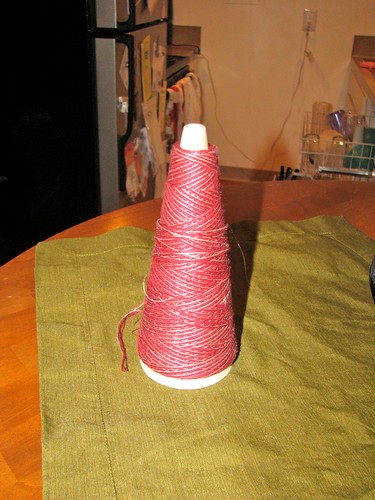
I am used this Yarnia-blended yarn (sorry I'm not the best photographer of yarn... it always comes out with a glare...) It is two strands of red silk/poly, two strands of red linen, and one strand of a taupe/natural linen. I think the one contrasting strand gives the fabric a lot of interest and a more "rustic" feel.
After I finished crocheting the front and then took the piece to Jo-Ann Fabrics to find fabric for the bottom. I found the absolute perfect fabric to create the look I wanted--something that could be worn in the summer and also work to transition in to fall if worn over long sleeves and leggings.
The pattern is really clearly written and I was able to follow all the stitches without any trouble, even as a very novice crocheter, but I think the gauge instructions are off. I followed the 40" chest directions and even though my single crochet gauge was tighter than recommended my pieces still came out at 22".
If you are going to make this pattern I would be sure to do some math with the gauge you're getting and the total number of stitches to make sure you'll get something that fits.
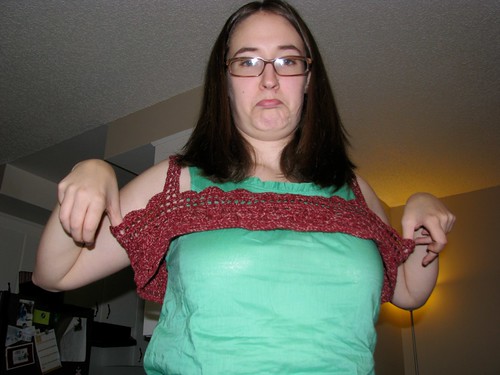
As the project calls for sewing on a sewing machine anyway, I decided rather than rip all the way back to the beginning and start over, I would serge the seams smaller. For those of you not familiar with sergers, they cut fabric and sew a thread binding around the cut edge as they go. That’s right, I cut my crochet. But look how much better the top fit afterward.
Then came time to piece the fabric bottom together. The pattern instructions say to take two large piece of fabric, sew them together into a tube, gather up the top of the tube, and sew that to the bodice.
This creates the babydoll look that you can see in the pattern pictures and in many people’s projects on Ravelry. I think I mentioned before that, while this is a great look for some women, it is not the most flattering look on me. What I may not have mentioned is that I LOVE sundresses. They are probably my single favorite piece of clothing and one of the saddest things about living in the Pacific Northwest is that the weather often precludes wearing them until well into June. I decided to add to my sundress collection.
I’m sorry I didn’t stop to take lots of pictures during the construction of the dress. It was one of those situations where I just started working and didn’t look up until I had a dress. Here is what I did:
Since the bodice fits around the widest part of the chest (which on me is the widest part until my hips) I measured the circumference of the bodice and cut two strips of fabric half that circumference plus 1 inch (the half inch is for the seam allowance) and as long as the dress I wanted (for me this was knee-length).
Next. I tried on the bodice and measured how far from where the bodice ended to where my hips are. This is because I needed to add extra fabric at the hip, both because my hips are my biggest part and because I wanted the skirt of my dress to flair.
After a rough measurement to my hips I seamed the two strips of fabric to that measured length. This means that the dress is just a straight tube from where it attaches to the body down to roughly my hips.
To add fabric to the hip of the dress and make it flair I inserted two wedge shaped pieces of fabric into either side of the tube. To do this I measured the length of the unseamed bottom part of my tube – for my dress this was roughly the distance from my hips to my knees. This became the side length of my triangle inserts. The bottom of the triangle was the total extra width I wanted the bottom of the skirt to have divided by 2 (because there is one insert on each side).
Once my two triangles were cut out, I sewed each long side of the triangle into the opening left on the sides of my tube. (if you have ever had occasion to turn a pair of jeans into bellbottoms this process is exactly the same.)

I hemmed the whole thing around the bottom and I was finished… I thought. Then my boyfriend came over and I proudly showed him my finished dress. He praised my craftyness and took pictures for me, but he said he felt like the dress was “missing something.”
When I asked him what it could possibly be missing he said, “I don’t know, maybe some white lace around the bottom?” This was an exceptionally strange suggestion coming from a man who usually appreciates my craftiness from a safe distance refusing to participate in “which color/texture/hemline/sleeve-length/etc. looks better” conversations.
I was skeptical at first… white lace on a dress with such deep colors… I was unsure. But, figuring I had nothing to lose and I could always take it off again, I went back to the fabric store for some lace trim.
After sewing the lace to the dress I instantly was amazed at the result. It looked like it was meant to be there. It completely pulled the dress together and made it look “finished.” I am so glad I decided to try the unusual suggestion.
Lastly, because I wanted to accentuate my waist without having to go through the bother of adding waist shaping to the dress, I made a quick tie to cinch in the waist of the dress. I crocheted 3 really long chains—long enough to wrap loosely around my waist twice—then braided the chains together. It is just the right length to tie into a bow at my waist bringing the dress in and also carrying the crochet into the body of the garment.
All in all I would say that this pattern has major issues in the gauge department (you do the math, this time it really wasn’t me!), and I would have preferred not to have serged seams running through my crochet, but I love the end result and I love that this pattern inspired me to mix my two favorite hobbies -- yarnplay and sewing.
This is currently hanging up in Yarnia on display to give browsers pattern ideas. I'll get it back in the middle of winter (when no one is thinking about knitting or wearing summer clothes...) which means that I'll probably be wearing it all the time next summer.
If you are going to make this pattern I would be sure to do some math with the gauge you're getting and the total number of stitches to make sure you'll get something that fits.
As the project calls for sewing on a sewing machine anyway, I decided rather than rip all the way back to the beginning and start over, I would serge the seams smaller. For those of you not familiar with sergers, they cut fabric and sew a thread binding around the cut edge as they go. That’s right, I cut my crochet. But look how much better the top fit afterward.
Then came time to piece the fabric bottom together. The pattern instructions say to take two large piece of fabric, sew them together into a tube, gather up the top of the tube, and sew that to the bodice.
This creates the babydoll look that you can see in the pattern pictures and in many people’s projects on Ravelry. I think I mentioned before that, while this is a great look for some women, it is not the most flattering look on me. What I may not have mentioned is that I LOVE sundresses. They are probably my single favorite piece of clothing and one of the saddest things about living in the Pacific Northwest is that the weather often precludes wearing them until well into June. I decided to add to my sundress collection.
I’m sorry I didn’t stop to take lots of pictures during the construction of the dress. It was one of those situations where I just started working and didn’t look up until I had a dress. Here is what I did:
Since the bodice fits around the widest part of the chest (which on me is the widest part until my hips) I measured the circumference of the bodice and cut two strips of fabric half that circumference plus 1 inch (the half inch is for the seam allowance) and as long as the dress I wanted (for me this was knee-length).
Next. I tried on the bodice and measured how far from where the bodice ended to where my hips are. This is because I needed to add extra fabric at the hip, both because my hips are my biggest part and because I wanted the skirt of my dress to flair.
After a rough measurement to my hips I seamed the two strips of fabric to that measured length. This means that the dress is just a straight tube from where it attaches to the body down to roughly my hips.
To add fabric to the hip of the dress and make it flair I inserted two wedge shaped pieces of fabric into either side of the tube. To do this I measured the length of the unseamed bottom part of my tube – for my dress this was roughly the distance from my hips to my knees. This became the side length of my triangle inserts. The bottom of the triangle was the total extra width I wanted the bottom of the skirt to have divided by 2 (because there is one insert on each side).
Once my two triangles were cut out, I sewed each long side of the triangle into the opening left on the sides of my tube. (if you have ever had occasion to turn a pair of jeans into bellbottoms this process is exactly the same.)
I hemmed the whole thing around the bottom and I was finished… I thought. Then my boyfriend came over and I proudly showed him my finished dress. He praised my craftyness and took pictures for me, but he said he felt like the dress was “missing something.”
When I asked him what it could possibly be missing he said, “I don’t know, maybe some white lace around the bottom?” This was an exceptionally strange suggestion coming from a man who usually appreciates my craftiness from a safe distance refusing to participate in “which color/texture/hemline/sleeve-length/etc. looks better” conversations.
I was skeptical at first… white lace on a dress with such deep colors… I was unsure. But, figuring I had nothing to lose and I could always take it off again, I went back to the fabric store for some lace trim.
After sewing the lace to the dress I instantly was amazed at the result. It looked like it was meant to be there. It completely pulled the dress together and made it look “finished.” I am so glad I decided to try the unusual suggestion.
Lastly, because I wanted to accentuate my waist without having to go through the bother of adding waist shaping to the dress, I made a quick tie to cinch in the waist of the dress. I crocheted 3 really long chains—long enough to wrap loosely around my waist twice—then braided the chains together. It is just the right length to tie into a bow at my waist bringing the dress in and also carrying the crochet into the body of the garment.
All in all I would say that this pattern has major issues in the gauge department (you do the math, this time it really wasn’t me!), and I would have preferred not to have serged seams running through my crochet, but I love the end result and I love that this pattern inspired me to mix my two favorite hobbies -- yarnplay and sewing.
This is currently hanging up in Yarnia on display to give browsers pattern ideas. I'll get it back in the middle of winter (when no one is thinking about knitting or wearing summer clothes...) which means that I'll probably be wearing it all the time next summer.